Automatic Rain Barrel
Feb 7, 2011 Rain Barrel
We have a small garden out by our shed. It is not very big, sort of a “Square Foot Garden”. Just enough for some tomatoes, a cucumber and a few other plants. Of course one big key to a good garden is consistent watering, and of course I am a bit lazy and not very consistent. I wanted something to do it for me automatically.
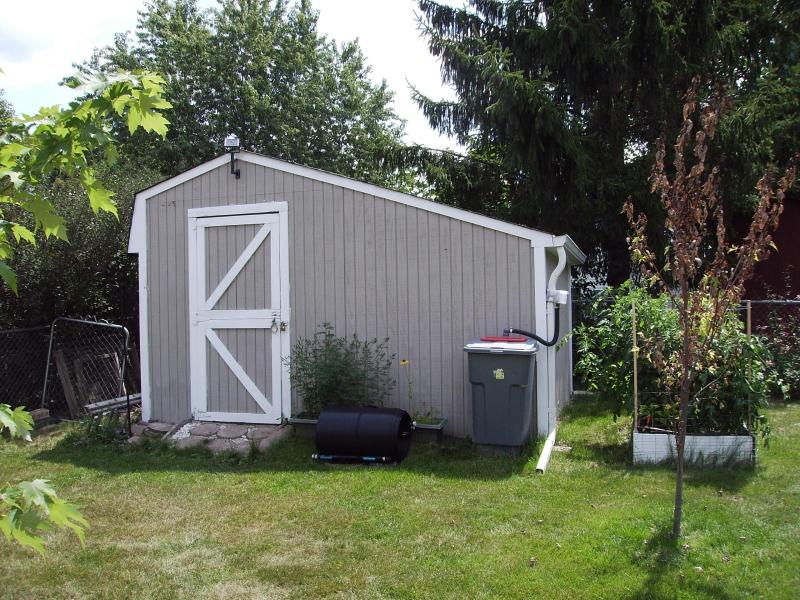
The shed is about 50′ from the house, not far, but far enough to have to drag out a big hose. Living in a cold climate, the obvious solution do not work well here. I could not simply bury a hose without worrying about draining it so it will not freeze. I also did not want to bury any wire for automation either. I needed something that would stand alone, self power and supply water.
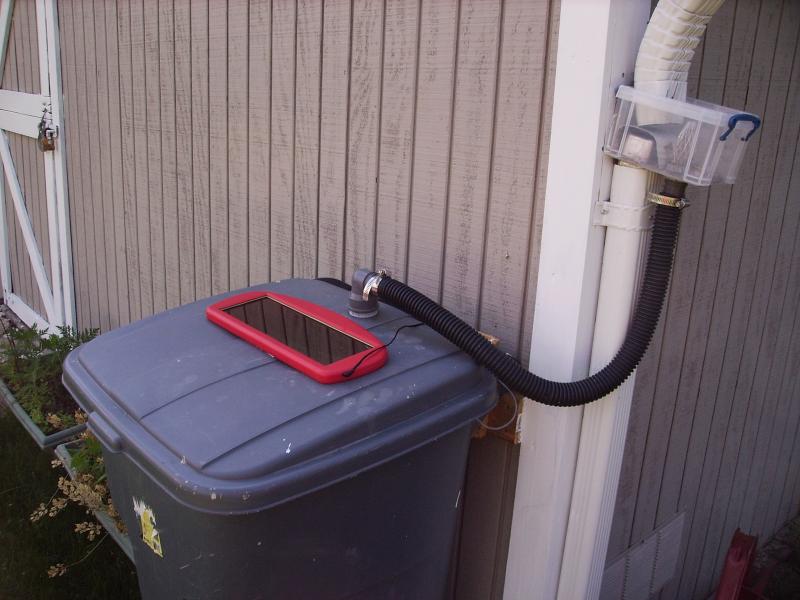
I decided on a rain barrel to attach to my shed. I simply used a 50 gallon trash can. I am not using the water for direct consumption, only irrigation. The first one was a heavy duty one some one had thrown away. (You can only use 35 gallon max for garbage here, so I could not use it for that) I lined it with a heavy 55 gallon “contractors” bag to keep the water clean and so it could be replace for easy cleaning. To hook it up to the gutter on the shed I made my own diverter/screen. (More on that later) The roof is about 10′x15′ and can fill the barrel with a moderate rain fall.
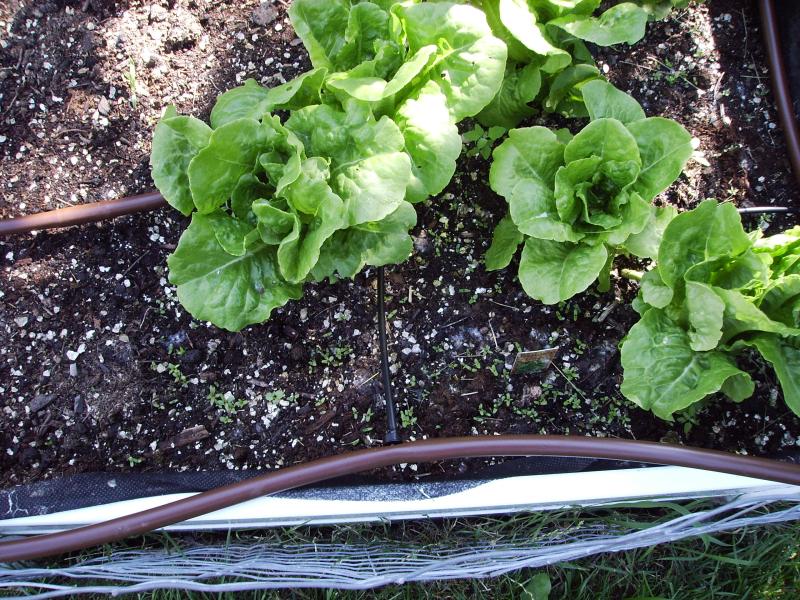
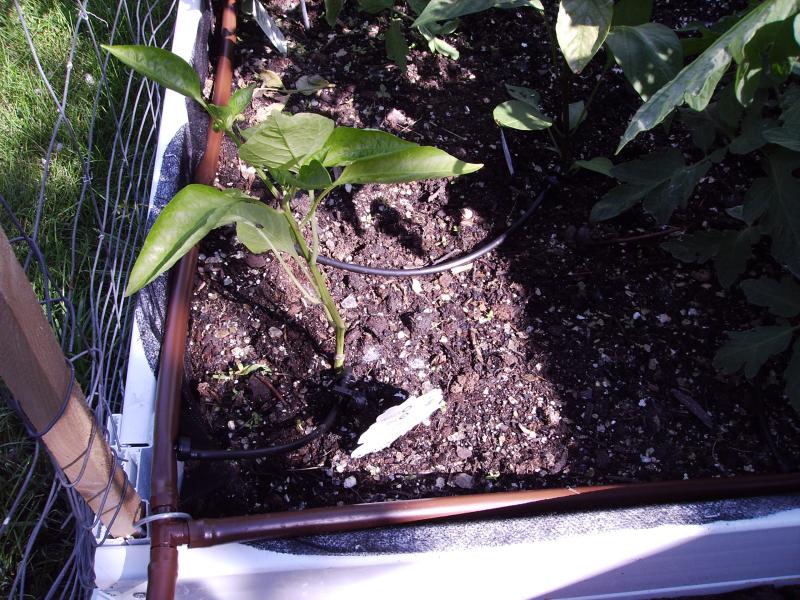
With the water supply solved, I looked at the automation part. Anything I built needed to be solar/battery powered do to the remoteness. The main design goal was to water each night a set amount, reset the next day, and keep itself charged. The first version was built around two items from Harbor Freight. A battery powered back pack sprayer, and a solar trickle charger. The sprayer had a 12v gel cell battery and quite heavy duty pump and was used as a 5 gallon reservoir. The charger was used to charge the battery and to trigger the system each night at dark. The sprayer had a niffy little charging circuit that sensed over charging and shut down on low battery. With a little modifying, and a latching relay, I was able to get it to sense when the sun went down and latch the relay shut turning on the pump. I reversed the pump to suck water from the rain barrel and fill the backpack. The backpack was hung about 5 feet above the garden and 2 feet about the rain barrel. This kept the barrel from siphoning, and provided some pressure to water with. I put a reed switch/magnet in a float in the backpack so when it was full, the pump shut off. The system would not run again until the next day when the solar panel would once again power the circuit. The water would then drain out the backpack to water the garden through a drip feed system. The water ran out o backpack at the same time it was filling so since the backpack held about 5 gallons and about a gallon ran out while it filled, about 6 gallons was supplied each cycle. I could adjust the amount by the position of the float switch. Last thing was another float switch in the bottom of the barrel so if it ran dry, the system would be disabled. Of course, during the day the solar panel charged the battery. Since the pump only ran for about 4 minutes, trickle charge was enough to offset the draw each day. Towards the end of the season there were a lot of overcast days and the charger finally fell behind, so I used and extension cord to use the charger that came with the sprayer to let it charge for a few hours.
The original set up worked well the first year. The tomato plants were over 6 feet tall! Went on vacation with no worries. There were a few dry spells during the summer when the barrel did not get filled, so I ran out the hose and filled it and was good for another week.
There were a few draw backs I wanted to address. Cost, overkill, and reproduce-ability. Cost: I got the sprayer on an open box sale, but it would have normally been quite expensive. Overkill: The pump was way, way bigger than was needed as well as the battery needed to drive it. Reproduce-ability: Modifying the charge circuit was not a good solution, and the normal cost of the sprayer was too high to duplicate. The way I had the whole system installed would not work for most people, the reservoir was hung inside the shed. I started looking for cheep available solutions.
Here are the main components I chose for the second version.
- Pump: Small 12 volt bilge pump form Harbor Freight.
- Battery: 9.6 volt NiMH battery pack and charger from Radio Shack.
- Solar Cell: Same as before.
- Barrel: Cheaper trash can.
- Reservoir: 1 or 2, 5 gallon buckets for up to ~10 gallon capacity.
- Controller: New, low power design.
- Enclosure: Mount the whole works in a free standing frame.
I found the pump would run just fine on only 9.6 volts and could still pump water more than fast enough to the hight I wanted to go. The battery was chosen since it came with a charger and NiMH were slightly easier to charge than gel cell and had a lot higher capacity than NiCd. The buckets were cheep and handy. The whole works now gets mounted in a PVC pipe frame that can be enclosed.
I also wanted to upgrade the controller while still keeping it as simple as possible. I won’t go into it to much here, but there were several revisions, and it is almost there. It went form a relay system to using MOSFETs for the lowest power drain. I want it to be made for discreet components so any one could perf-board it. I may eventually make a “deluxe” one using some micro-controller, but then you would need the development tools to make your own, or have to buy it form me. It would be cooler with more features, but not necessarily better. (KISS) I am still trying to add a simple soil moisture sensor to avoid unnecessary watering.
This past year the new setup was tested, but not as thoroughly as I would have liked. My new little girl took a lot of attention away from projects. The good news is it worked, mostly. I am now getting ready for my 3rd try. I have all the main parts now and just need to refine the controller, which is in the works.
My intention is to get a final design that works well, cheep, and easy to make from easily obtainable parts. I will then post all the details so some one else could copy it. (or improve upon it) I want this to be “open source” so any suggestions I get for improvement will be incorporated and you will be credited here. If you want to make your own, or ones for friends, fine, but please remember where it came from if any profit is involved and do the right thing!* If there is any interest at that time I will consider putting together some form of a “kit” for those who do not want to do all the leg work or don’t have the tools.
*I have no intention of trying to patent this since I have found it to be a waste of time and money with today’s patent system. Only those with enough money to out last the lawyers can win. If a big company wants it, they take it and dare you to come after them. (and their lawyers) If I had that kind of money, I would not be trying to make a few bucks like this. So again, do the right thing. Please don’t just rip me off. Point people to my site or contribute yourself, and I will keep trying to make things better.
UPDATE:
Picture of updated system.

Tags: controller, electronics, rain barrel


